
January 2023 Update: If you are an MEV searcher, Blocknative now offers an MEV bundle RPC endpoint. Searchers can interact with the RPC endpoint at https://api.blocknative.com/v1/auction. The API provides JSON-RPC methods for interfacing with Blocknative builders, which are documented via our bundle docs.
At Blocknative we are often asked about getting started in the world of MEV. In this blog, I will go over the creation of a very basic arbitrage script that highlights some key ideas in the world of MEV bots.
MEV, or Maximal Extractable Value, is essentially the maximum value that can be extracted from a block. While this had traditionally been an opportunity that only miners could participate in—which is why it was sometimes called Miner Extractable Value—the democratization of the mempool has allowed more opportunities for traders to extract value by influencing what goes into a block. MEV Searchers can easily affect which transactions are included and excluded, or even change the order of transactions in a block, by seeing what’s already in the mempool and then timing and pricing their transactions accordingly.
These Searchers will typically run algorithms to detect profitable MEV opportunities and have bots automatically submit any profitable transactions to the network. This blog details my attempt at creating one of these bots, and the lessons I learned along the way. You can treat this as a beginner’s guide to help you get your creative juices flowing and start thinking about other strategies unique to you.
Please note the script and smart contract in this blog are for educational purposes only. You will not make any money using this code, so please do your own research before deploying any of your own money into any opportunity. Ethereum mainnet is extremely competitive, and this idea is quite common among the elite bots in the ecosystem.
What is an arbitrage strategy in the world of MEV?
Arbitrage is an MEV strategy that allows traders to profit from price differences between the same asset in different markets. In the traditional financial world, this creates an opportunity to make two trades to get the two exchanges into equilibrium—and make a little profit for doing so.
You would start with asset A and sell it for asset B on the exchange where asset B is cheaper. Then, you would take asset B and sell it for asset A on the other exchange, receiving more of asset A in return than when you started. This basic example is extremely competitive in traditional finance and many High Frequency Traders compete against each other to be the first ones to complete the arbitrage opportunity.
In the MEV world, things are a little bit more complicated. In crypto, transactions are submitted to the mempool—which, for the most part, is public— for inclusion into the next block. This means traders can see pending transactions in the mempool and know what the effects will be once they are finalized on-chain.
This added visibility results in MEV arbitrage working slightly differently than traditional arbitrage because traders don’t need to wait until transactions are on-chain to find an opportunity. As a result, MEV searchers need a real-time data feed of the mempool to analyze each transaction as it comes in.
Once you detect a transaction that might cause an arbitrage opportunity when it lands on-chain, you can send your two transactions that will complete the arbitrage opportunity directly into the mempool or to the flashbots private relay as a bundle. If done correctly, this means the mempool transaction that creates the opportunity + your two transactions will all be mined in the same block. As a result, the moment that arbitrage opportunity is created it is also completed by the next two transactions—your two transactions.
Let’s break this down with a completely unrealistic, but hopefully illuminating example.

Suppose you are monitoring the mempool and you detect a transaction that will impact the liquidity pool on Uniswap V2 for token A and token B. Since you know that liquidity pools are governed by the equation x * y = k (I am ignoring fees in this example), then you know when you see somebody submit a swap for 2 of token A for as much of token B as possible, you can calculate (based on the reserves of those tokens in the liquidity pool, which, in this case, are 10 and 10) that they will receive 1.7 of token B in return.
The key insight is that you know this transaction will impact the price between token A and token B on Uniswap V2, but not on another DEX like Sushiswap… at least not until somebody takes advantage of the arbitrage opportunity. The moment this transaction is mined, token A will be cheaper on Uniswap than Sushiswap, so whoever can sell token A on Sushiswap for token B and then sell those token Bs on Uniswap for token A should end up with more token A than they started. And that is exactly what this example illustrates.
There is some specific math that you can do to calculate the optimal amount to trade back and forth, but is beyond the scope of this post.
Searching for arbitrage opportunities
While doing some research on the various opportunities in MEV, I stumbled upon a pre-built smart contract in this awesome github repo, which walks you through how to optimally calculate the correct amount needed to arbitrage between two Uniswap V2 DEXs—for example Uniswap V2 and Sushiswap.
Since this project wasn’t really about taking a deep dive in solidity, this repo was perfect to get a proof of concept. The key insight with this smart contract is that you can supply it two pools—one Uniswap pool and one Sushiswap pool— and return whether there is any profit arbitraging the two pools. However, the calculation is being done by looking at the reserves of those two pools as they currently stand (ie. the latest block state).
But what if you knew how those pools were going to change prior to the next block? Then you would know about arbitrage opportunities before they happen on-chain and you could submit your arbitrage transaction in the correct position to take advantage of these opportunities. My goal in this project was now to write a basic script that modifies this smart contract to successfully detect arbitrage opportunities using the Blocknative Simulation Platform’s net balance change calculation.
Writing a basic arbitrage script
This post is not a post to learn about solidity. There are plenty of great posts and tutorials out there, but in order to truly compete for MEV opportunities (at least in the EVM world), you need to know some solidity.
That said, I used my limited knowledge of solidity to update the smart contract to fit my needs. In order to calculate the real-time profit of an arbitrage opportunity, I would need to have some way of supplying my getProfit function with an adjustment on a liquidity pool. This adjustment is when I see a swap transaction in the mempool that will impact the Uniswap or Sushiswap liquidity pool.
I incorporate the impact of the mempool transaction when I calculate the profit potential for the arbitrage opportunity. To incorporate this adjustment, I created a new struct called ‘Adjustments’ that would host the pool that needed to be adjusted, the direction it needed to be adjusted and the amount of adjustments to each token in the token pair. Then you will notice that getProfit relies on getOrderedReserves to calculate the reserves of each pool and the correct direction of the trades. Therefore, I added some logic to getOrderedReserves that would take in the mempool data of a token swap on Uniswap or Sushiswap and then adjust the token reserves of that pair so when getProfit was called it would incorporate the mempool data instead of just the latest chain state.
function getOrderedReserves(
        address pool0,
        address pool1,
        Adjustments memory adjustment,
        bool baseTokenSmaller
    )
        internal
        view
        returns (
            address lowerPool,
            address higherPool,
            OrderedReserves memory orderedReserves
        )
    {
        (uint256 pool0Reserve0, uint256 pool0Reserve1, ) = IUniswapV2Pair(pool0).getReserves();
        (uint256 pool1Reserve0, uint256 pool1Reserve1, ) = IUniswapV2Pair(pool1).getReserves();

        if (pool0 == adjustment.adjustmentPool) {
            if (adjustment.adjustmentToken0 == IUniswapV2Pair(pool0).token0()) {
                pool0Reserve0 -= adjustment.adjustment0;
                pool0Reserve1 += adjustment.adjustment1;
            } else {
                pool0Reserve1 -= adjustment.adjustment0;
                pool0Reserve0 += adjustment.adjustment1;
            }
        } else {
            if (adjustment.adjustmentToken0 == IUniswapV2Pair(pool1).token0()) {
                pool1Reserve0 -= adjustment.adjustment0;
                pool1Reserve1 += adjustment.adjustment1;
            } else {
                pool1Reserve1 -= adjustment.adjustment0;
                pool1Reserve0 += adjustment.adjustment1;
            }
        }
Now that I have adjusted the smart contract to be able to incorporate the real-time mempool data, I can complete my script using Blocknative’s mempool API and flashbots private relay.
Using Simulation Platform, each simulation is done in isolation against the current block state, meaning there is some degree of probability involved in the ‘pending-simulation’ payloads. However, if the transaction is at the top of the block, then that effectively means it is happening against the current block state, since there won’t be any transactions between the current block state and this one. The best way to ensure it gets to the top of the block (or at least close to it) is to use flashbots private relay.
For this project, I looked at pending simulation events on the Uniswap V2 and Sushiswap routers using Blocknative’s Javascript SDK. The pending simulation payloads include net balance changes on all the addresses involved (like the liquidity pool), allowing me to do two things:
- Check to see if that pair exists on the other exchange
- Use the balance changes as inputs as the ‘adjustments’ in my getProfit function in my smart contract
As I receive these events I loop through the netBalanceChange list in our Simulation Platform payload and I skip when the address is equal to the actual router itself (because I am only looking for liquidity pool addresses) or if the netBalanceChange[index].address doesn’t have 2 elements (if it only has 1 element, then it can’t be a pool, because a pool would have 2 or more token reserves with net balance changes).
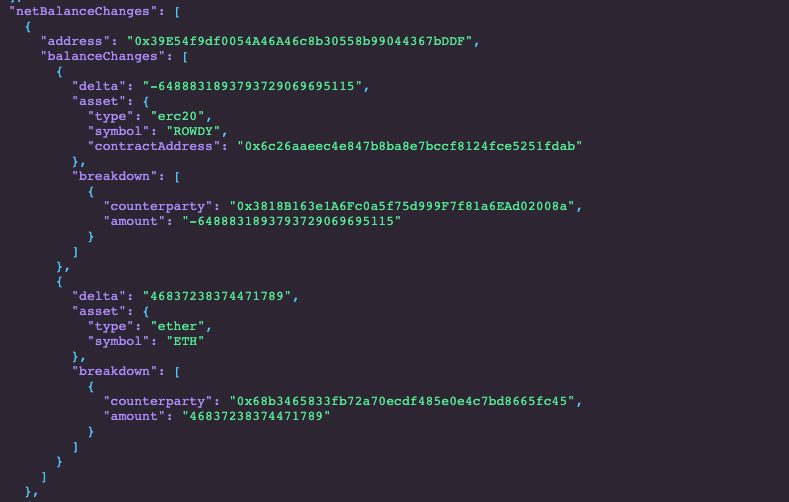
If one of the addresses in the netBalanceChange field is not one of the router addresses and has 2 different token addresses that have net balance changes, then it must be a pool address. I now have the pool address, the token addresses involved, and the net balance changes of each token. I can now check to see what the other DEX’s liquidity pool address is so that I can supply it to my smart contract. If the other DEX does not have a liquidity pool with the same token pair, then I can’t arbitrage between the two, so I move on.
try {
      for (entry in transaction.netBalanceChanges) {
        if (transaction.netBalanceChanges[entry].balanceChanges.length !== 2
          || blacklist.indexOf(transaction.netBalanceChanges[entry].address) !== -1 )
          { continue }

        pairAddress = transaction.netBalanceChanges[entry].address;
        tokenAddress1 = transaction.netBalanceChanges[entry].balanceChanges[0].asset.contractAddress;
        tokenAddress0 = transaction.netBalanceChanges[entry].balanceChanges[1].asset.contractAddress;
        adjustment1 = transaction.netBalanceChanges[entry].balanceChanges[0].delta;
        adjustment0 = transaction.netBalanceChanges[entry].balanceChanges[1].delta.substring(1,);

        adjustment0 = ethers.utils.parseEther(ethers.utils.formatEther(adjustment0))._hex
        adjustment1 = ethers.utils.parseEther(ethers.utils.formatEther(adjustment1))._hex
        otherPairAddress = await getSushiPair(tokenAddress0, tokenAddress1)

        if (otherPairAddress === undefined) {
          otherPairAddress = await getUniPair(tokenAddress0, tokenAddress1)
          if (otherPairAddress === undefined) {
            continue
          }
        }
Likewise, if the other DEX does have a liquidity pool with the same token pair, then I can arbitrage between the two. Using my script, this means I will have detected a pending swap on either Uniswap or Sushiswap in the mempool and I have located the same liquidity pool on the other DEX. Now I have all the information I need to supply my smart contract to see if there is a profit opportunity.
The result I get from my smart contract doesn’t include gas, so I do a naive calculation to see what the all in gas cost would be (including my extra tip to the miners on the flashbots relay). I knew my two transactions would cost about 240K gas, so I hardcoded that in for my net-profit calculation. For my gas price, I assumed I would need to give up 95% of my gross profit to compete in the private relay. The 95% was hardcoded and arbitrary (room for improvement!).
If the net calculation is greater than 0, I have successfully found an arbitrage opportunity where I will net 5% and give the miner 95%!
profitHex = await arbContract.getProfit(pairAddress, otherPairAddress, pairAddress, tokenAddress0, adjustment0, adjustment1)
const gross = ethers.utils.formatEther(profitHex.toString(10).split(',')[0])
const gasLimit = 240000
const gasFee = Math.floor(ethers.utils.parseEther(gross)*.95/gasLimit)
const gasCost = gasLimit*gasFee
const net = ethers.utils.parseEther(gross) - gasCost
Constructing a flashbots bundle for arbitrage
Next, I needed to construct my flashbots bundle to send to the relay. Since the detected mempool transaction could be a type 0 or type 2 transaction, I must have scenarios for both. For more on using mempool transactions in your bundles, you can refer to our prior post on using Blocknative with Flashbots.
if (transaction.type == 2) {
            params = [
              '0x01',
              transaction.nonce === 0 ? '0x' : ethers.utils.hexlify(transaction.nonce),
              ethers.utils.parseEther(ethers.utils.formatEther(transaction.maxPriorityFeePerGas))._hex,
              ethers.utils.parseEther(ethers.utils.formatEther(transaction.maxFeePerGas))._hex,
              ethers.utils.hexlify(transaction.gas),
              transaction.to,
              transaction.value === '0' ? '0x' : ethers.utils.hexlify(transaction.value),
              transaction.input,
              [],
              transaction.v === '0x0' ? '0x' : transaction.v,
              transaction.r,
              transaction.s
            ]
            s1 = '0x02'+encode(params).toString('hex');
          } else {
            params = [
              transaction.nonce === 0 ? '0x' : ethers.utils.hexlify(transaction.nonce),
              ethers.utils.parseEther(ethers.utils.formatEther(transaction.gasPrice))._hex,
              ethers.utils.hexlify(transaction.gas),
              transaction.to,
              transaction.value === '0' ? '0x' : ethers.utils.hexlify(transaction.value),
              transaction.input,
              transaction.v,
              transaction.r,
              transaction.s
            ];
            s1 = '0x'+encode(params).toString('hex');
          }
I used my modified smart contract to construct my transaction, which would include either two internal transactions or two swaps between the two DEXs.
const s2 = await arbContract.populateTransaction.flashArbitrage(
            pairAddress,
            otherPairAddress,
            pairAddress,
            tokenAddress0,
            ethers.utils.parseEther('0')._hex,
            ethers.utils.parseEther('0')._hex
          )
          s2.gasPrice = ethers.utils.hexlify(gasFee)
          s2.gasLimit = ethers.utils.hexlify(500000)
          s2.nonce = await wallet.getTransactionCount();
With the transaction constructed, I then created the flashbots bundle and simulated it to ensure the transaction wouldn’t fail for any reason. I also created a final net-profit calculation to ensure I was still actualizing a profit. If my transaction passed the simulation, and I was still making a profit, then I submitted it to the flashbots relay for inclusion.
const signedTransactions = await flashbotsProvider.signBundle([
            {
              signedTransaction: s1
            },
            {
              signer: wallet,
              transaction: s2
            }
          ])

          const blockNumber = transaction.pendingBlockNumber+1;

          const simulation = await flashbotsProvider.simulate(signedTransactions, blockNumber);
          if ('error' in simulation) {
            console.log(`Simulation Error: ${simulation.error.message}`)

          } else {
            if (simulation.firstRevert!==undefined) {
              console.log(simulation.firstRevert.revert)
            } else {
              const net2 = ethers.utils.parseEther(gross) - simulation.results[1].gasUsed*gasFee
              console.log(`Net: ${ethers.utils.formatEther(net2)} | Pair address: ${pairAddress} | TxHash: ${transaction.hash}`)
              console.log(simulation)
              if (net2>0) {
                console.log(`Coinbase diff: ${simulation.coinbaseDiff}`)
                const submittedBundle = await flashbotsProvider.sendRawBundle(signedTransactions, blockNumber);
                const bundleResponse = await submittedBundle.wait();
                console.log(bundleResponse)
              }
            }
          }
Lessons learned from creating a basic arbitrage bot
I ran my script for several days and it worked exactly as intended—it detected profitable opportunities using Blocknative’s mempool API and submitted them to flashbots to compete for inclusion by a miner. However, the opportunities this script competed for were VERY competitive and I wasn’t able to outcompete the other bots.
The biggest reason for this was that most of the other bot’s smart contracts were far more gas efficient than mine, allowing them to pay more to the miner to get included. Additionally, using flashswaps is pretty inefficient compared to just doing the swaps with tokens you already own. There are a whole host of other gas optimizations out there, but that is a very competitive, tough game to play against people far better at solidity (and Yul!) than I am.
Other areas that I didn’t optimize include:
- Choosing the correct tip to send to the miner.
- Only looking at two DEXs.
- Only looking at arbitrage between two tokens. A path-finding algorithm across many pairs could result in better profit potential.
- Trying this out on other EVM compatible chains like Polygon.
- Cross-chain MEV.
Trade with an edge using Blocknative’s Simulation Platform
Finding the best arbitrage opportunities is impossible without the best mempool data feeds. Blocknative’s Simulation Platform leverages our Global Mempool Data Platform to provide probabilistic outcomes of every public pending Ethereum transaction, including detailed traces of each smart contract function call and net balance changes.
MEV searchers can go hands-on today and monitor simulated transactions directly on Mempool Explorer. Our powerful UI enables users to filter on everything in the payload to ensure you get a fine-tuned view of the mempool that fits your exact needs. These saved configurations can easily be integrated into any project using websockets or webhooks.